Tuesday, March 24, 2009

Resturaunt Inspired Chicken Alfredo Experiment

Today I decided to experiment with on of my favorite italian dishes, breaded chicken with a creamy white alfredo sauce. I've had it a handful of times at various resturants, and never tried to make it at home until today.

First, I took a pack of boneless, skinless chicken breasts. They come about thee to four in a pack, so I decided to half them to make them thinner; which for me yielded 6 halves total. I took two eggs, slightly scrambled them in a bowl, and placed parmesan bread crumbs in another bowl. I took each half and dipped them first in the egg, careful to coat each side, and then dredged them in the breadcrumbs to coat also. I placed each on in a glass pan, that was already sprayed with non-stick spray.


Photobucket

I put it all in the oven on 375 degrees and baked for about 30-45 minutes. I'm putting a varying time, cause it really depends on the thickness of your chicken breasts for how long it takes. It took mine about 37 minutes to cook completely, without being dried out. SO WATCH IT CAREFULLY!!! Unfortunately, I'm the queen of drying out meat, so I had to learn to watch over my food as much as possible.
Photobucket
The chicken came out on the crispy side, and was really tasty as is (as you can tell, I took a piece off to try it, lol)
In the meanwhile, while the chicken was baking, I boiled my favorite noodles I thought would compliment the meal. I don't think it matters what kind you use. The closer my chicken got to being finished, I started warming up my creamy alfredo sauce. I decided to use:

Photobucket

There are a bunch of different name brands for alfredo sauce, but I was drawn to this one because it was on sale, AND it had mushrooms in it. I'm a mushroom fiend, lol.

As a side dish, I steamed some mixed veggies, which in my opinion, from my extensive "Top Chef" (Bravo TV reality show) exposure, gives nice color and texture to the meal.

Photobucket

Quick and easy!!

Photobucket

kid's plate

Photobucket

adult plate

Overall, this was very easy, and very tasty! Next time, however, I'd probably try to heat up the sauce in the baking dish during the last couple of minutes of baking, so that way the whole meal can taste integrated. While it was very good, it tasted like noodles topped with chicken and then topped with alfredo sauce. It didn't taste blended like you would taste at a restuarant. I was nervous about cooking the chicken too long, which is why I thought heating it up on the stove top was a good idea. But timing, obviously, is the key. So try it at home, or give me your variation of this yummy dish!

Sunday, March 15, 2009

Pimpin' out Pancakes

Photobucket

This morning, I woke up craving some over the top delicious, but different pancakes. I had all sorts of ideas going through my head... one in particular was banana walnut pancakes. Never before have I experimented with pancakes; either I have been to scary about the possible results or didn't have ingredients to play around or the time. Well, today, I decided to experiment with my pancakes, and I'm so glad I did!

First, I like the fact that "pimpin out pancakes" needs no rhyme or reason. I literally made a batch of Aunt Jemima pancake mix and grabbed all my fixings to just throw in it. Now, my family is very traditional when it comes to making pancakes, so I dare not experiment with their Sunday breakfast. So I made their pancakes first, and then I played around with mine.

To prepare, I sliced some very ripe and soft bananas into thin chunks, and then I cut those thin circles into semi-circles. I added some walnuts (I had some left over from my banana fosters recipe) to my cut bananas, and just stirred it around to make them evenly mixed. After I poured a couple of spoonfuls of the pancake mixture into my hot pan, I sprinkled the banana/walnut mixture on top, and then topped it off with more pancake mixture. Once I saw the bubbles in the pancake mixture (a sure sign it's ready to flip), I flipped it over. Be careful if you try this, the pancake is really heavy, so you can make it quite messy if you don't go slowly and take your time during the flip. It cooks really quickly, so a couple of flips, and you are done. I always put my butter on each pancake as soon as it comes off the pan, so the butter can melt (yummy).

I had some bananas left, and some chocolate chips, so I made some banana chocolate chip pancakes next. I did the same thing, spooned some pancake mixture on my hot skillet first, and then sprinkled with my semi-circle bananas and chocolate chips and topped it off with more pancake mixture. WARNING: Chocolate chips melt very quickly, if you didn't already know that, so you have to be quick! I learned that the hard way; while trying to wait for my bubbles to come through, I noticed some of the melted chocolate had started to cook in the pan through the pancake mixture. I think a good way to combat this is to wait until that bottom layer cooks completely, hence those air bubbles start popping through, and then throw the chocolate chips on top, so that way they won't slide down between the wet mixture and cook on the pan itself. And that way you can flip it quickly, and move not mess up the integrity of the pancake.

At this point, I couldn't find anything else I'd be willing to try. There was some ice cream topping stuff, that I considered for a split second, but by this time, I knew two experimental pancakes was probably enough, considering I didn't know how they were going to taste. So I decided just to make the last little mixture left as a regular plain-o pancake, lol.

Sat down to take a bite out of my creations, and WHOA...
I should've tried this a long time ago! Especially the banana walnut pancakes! At first, the texture threw me off, cause the bananas were a little slimy and the walnuts were firm and crunchy, but overall, the combination was really good! Now the chocolate chip banana ones were interesting as well, but I liked the banana walnut ones alot more! After eating them both, I gave Devin my plain-o pancake (he was on his fourth one by then...what am I going to do with this growing boy!!) so I was plenty satisfied with the two I had. Just wish I would've been more confident and made two, cause it left me wanting more!
I didn't get a chance to take any pics because my batteries were dead, but I highly recommend being imaginitive with your pancakes next time you have time. I found some tips online to help you next time you cook your pancakes:
  • Stir the batter with a whisk or fork just until dry ingredients are blended. The batter will be lumpy.
  • Overmixing the batter will make the pancakes or waffles tough.
  • Use a heavy frying pan or griddle for pancakes.
  • Preheat the griddle in advance, the griddle or waffle iron is hot enough when drops of water sprinkled on surface will dance.
  • Too cool a griddle produces flat, tough pancakes.
  • Too hot a griddle causes outside of pancakes to brown before center is cooked.
  • Cook pancakes until top side is full of bubbles; turn to do other side.
  • Batter that is too thin will result in flat pancakes.
  • Batter that is too thick won’t spread on griddle.
  • Turn pancakes only once during cooking.
  • Make big batches of pancakes & waffles to freeze the extra for quick & easy breakfasts.
  • Extra batter can also be refrigerated.

If you have any ideas on how to pimp out your pancakes, please share! I'd love to try experimenting more with it!

Wednesday, March 4, 2009

Challenge from the Dinner Spinner

So, I got my first iPod Touch a couple of weeks ago, and I simply adore it! I immediately spent hours in the app store while it was charging to find cool apps to add to it, forgetting the fact that it's an MP3 player (yeah, I have yet to put all my songs on there).


One of the cooler apps I put on there was compliments of All Recipes.com, one of my favorite recipe sites. It's called the Dinner Spinner (see it here: http://allrecipes.com/Features/More/iPhone.aspx). So with one click, you are on the home page. With the flick of the wrist in a shaking motion, it's shuffling through three categories: dish type, ingredients, and ready in. The first time I played with it, the first thing that came up for dish type was dessert, ingredients was fruit, and for the ready in, it said "slow cooker". Now I'd cook everyday in my slowcooker if I could find enough recipes to do it in, I really enjoy the freedom it gives you. And I've never met a slowcooker recipe my family didn't love. Literally, throw the ingredients in, cut it on, watch tv, play with your kids, check email, talk on the phone, go out to the stores, etc., and hours later, you got a delicious meal! So I digress...


So this app is suggesting it can find a fruit dessert recipe that can be done in a slow cooker. My first thought is "Yeah right" so I click "view matches" to see what it had. So to my amazement, the recipe it shows is a Slow Cooker Bananas Foster. WHAT! Anyone who knows me knows I LOVE bananas foster. Pretty much any dessert with bananas, I'm all for it. So I knew immediately, I'd have to try this dessert. The modified recipe is below (I say modified, cause the original says to use 1/4 cup rum, and I didn't want to use rum and I added 2 tablespoons of extra butter to compensate for the no rum factor)


Slow Cooker Bananas Foster


  • 4 Bananas peeled and sliced

  • 6 tablespoons of butter, melted

  • 1 cup of packed brown sugar

  • 1 teaspooon of vanilla extract

  • 1/2 teaspoon of ground cinnamon

  • 1/4 cup chopped walnuts

  • 1/4 cup of shredded coconut

So I grabbed my crockpot out the pantry, which I have yet to use since moving into our new home. It's a bit old school; I recieved it as a wedding gift when we got married in 2000. Check it out, lol:

Photobucket

I highly recommend, for any cook, to have a couple of cutting boards of different sizes on hand. I use this one for cutting fruit and vegetables, etc. Even though I have granite countertops, which is supposed to be safe to cut on, I'm not taking any chances, so I use my small cutting board to slice up the bananas.

Photobucket

I then placed all my ingredients in the cooker. The recipe suggests adding the coconut and nuts at the last 30 minutes, but knowing what I had to do that evening, I knew I wasn't going to be able to pay attention and remember to put it in. I hope it didn't affect the outcome too much, but we'll get to that later...

Photobucket

At this point, it already smelled really good. You can check out my ipod with the recipe sitting next to my crockpot, lol. So I stirred it around, and then cut it on. It took roughly 2 hours and half hours to cook to the point where I was happy with it. The recipe says to put cooker on high and cook for two hours and ten minutes. An extra twenty minutes wouldn't seem to make that big of a difference, but it tasted a bit thicker and looked more cooked after I checked it the second time.

Photobucket

Easy enough right? I know it doesn't look too appealing on the picture, but my kitchen area smelled so good from it, I couldn't wait to taste it. So I just served it with two scoops of ice cream and dug in!

Photobucket

First of all, the combination of hot and cold (this was served immediately after I turned my crockpot off) is already very good. So that immediately excites me, lol. But the sauce of this dessert, along with the banana-nut-coconut combination, was really good! I was very surprised! The only thing that I questioned was the consistency of the bananas. They weren't soft like I imagined they would be, but rather, stiff on the outsides and soft on the insides. I used very green bananas, so maybe I should've used riper ones (but that's all I could find at my grocery store). Also, I don't know if the rum factors in when cooking the bananas more, but I thought my son would try it and I'm nursing, so I was fearful of putting the rum in it. Also, my liquor box is still packed up, so I couldn't access my rum very easily, lol.

So next time, I will probably try to follow the recipe to the tee, and pick better bananas. I really enjoyed my version, so I will definitely try it again! Unfortunately, I was the only one able to taste-test it; my whole family was knocked out sleep. I did have leftovers of course, so I'll have to update how the reheating goes.

Oh, by the way, be careful eating this delicious recipe. According to the info on my dinner spinner, one serving is 541 calories! It has 31 mg of cholesterol, 84 g of carbohydrates and 20.7 g of fat! Ouch! Still worth it though! LOL

Thursday, February 26, 2009

Leftovers-the remix

My family does not like leftovers. Very seldom can I successfully re-present a meal, without the "not again" facial expressions and the "is there anything else in the fridge?" Don't get me wrong, there are a good handful of times it's okay, but for those meals that last more than an extra day, those are torture, lol.

So for me, remixing leftovers and having them be something totally different, without wasting food, is a great thing to do, yet a mind boggler. I'm still looking for great ideas but I did experiment with my kabobs days after I grilled them. I just happened to have some leftover rice in the fridge from a previous meal, and I took the kabobs off the stick, and tossed them in the rice. Talk about YUMMY! It made a sort of asian inspired dish, and the vegetables and pineapple with the rice was very good! I did it with both the leftover chicken and leftover shrimp.

For the lasagna, I did get around to doing my garlic bread the next day (although I'm late posting the blog about it). You would think the bread wouldn't make a big difference to the meal the next day, as it still is leftovers, but it did revitalize my meal all together. The recipe is below, again, compliments of Paula Deen:

Garlic Bread

  • 1 head garlic, unpeeled
  • 1 tablespoon olive oil
  • 1 cup (2-sticks) butter, softened
  • 3 tablespoons minced parsley leaves
  • 1/2 teaspoon ground black pepper
  • 1/2 teaspoon salt
  • 1loaf sourdough bread, split horizontally

First I chopped the top of the head of garlic off, and placed it in a square of foil and drizzled the olive oil on top and then sealed the foil around the garlic. I placed it in the oven for 30 minutes on 425. It made my kitchen smell amazing...it's something about garlic, I don't know what it is, but it always smells enticing to me!

After the garlic was done, it made it really soft. I was able to grab it, and literally squeeze all the soft garlic out into a mixing bowl. It is sticky though, so be sure to watch for that garlic outer layer (I don't know what it's called) that may come off and get into your mixture. I had to pull a couple out myself. I then added the butter, parsley, pepper and salt. I mixed it up really good, which will take a while to get it an even consistency. After, I cut my bread in half, and spread the mixture on top.

Photobucket

I had a bunch of the spread left over, so I placed it in a baggy and stuck it in the freezer (no sense in wasting it!) Not sure if I got the garlic completely soft, cause there were chunks of it that didn't completely "smush" well, as you can see from the picture. I stuck it in the oven on broil for a couple of minutes. You really have to watch it, it doesn't take long to cook at all at this point!

Photobucket

Some of the garlic actually became crispy, kind of hard to explain, but there were no longer any chunks of garlic left. I then reheated the lasagna, which by the way, gets better with age, and put the garlic bread on the plate with it.

Photobucket

Assuming Paula knew exactly what she was talking about, I followed the recipe to the tee. HOWEVER, while the bread had a good flavor, it was too buttery. I think I could've cut the butter in half, and it still would've been good OR just use a thicker peice of bread to put it on. I actually found sourdough bread in the bakery at my grocery store, so unless she was speaking of a thicker sourdough bread, this bread seemed to soak all the ingredients in it. There was a bunch of spread left, so I froze it for future garlic bread endeavors. It was easy to make, and I'll probably never buy frozen garlic bread again, because it was really tasty, but I know for sure next time, I'm going to use less butter!

http://www.foodnetwork.com/recipes/paula-deen/zesty-roasted-garlic-bread-recipe/index.html

Thursday, February 19, 2009

Lovin' La-Lasagna Compliments of Paula Deen

My family is crazy about lasagna. My son can stuff forkfuls after forkfuls in his mouth, while my husband dances a chair jigg. And that's just with the Stouffers frozen lasagna in the frozen food section at the grocery store. So, for the sake of my family's love for lasagna, I decided to try to make my own.

I got the idea from watching Food Network's tv chef Paula Deen. Everytime I watch one of her shows, she makes the recipes look easy and yummy, and I'd been wanting to try to do a lasagna for some time. On this particular episode, she also made roasted garlic bread, which I had planned on doing to compliment my meal, but I totally underestimated the amount of time it would take to make this lasagna. So, if you decide to try at home, and you want your dinner on the table by a certain time, I suggest giving yourself three hours to prepare it. OR, it just took me longer cause I didn't know what I was doing, and I had to deal with kids, lol.

First, I got all my ingredients together:

  • 1 1/2 pounds ground chuck
  • 1 pound ground Italian sausage
  • 1 onion
  • 2 cloves garlic, minced (I used 3 cause I love garlic)
  • 2 teaspoons ground oregano
  • 1 teaspoon ground basil
  • 1/4 teaspoon salt
  • 1/4 teaspoon pepper
  • 1 (14.5-ounce) can diced tomatoes with basil, garlic, and oregano
  • 2 (15-ounce) cans tomato sauce
  • 1 (6-ounce) can tomato paste
  • 1 1/2 cups small curd cottage cheese
  • 1 (5-ounce) package grated Parmigianno-Reggiano
  • 2 tablespoons freshly chopped parsley leaves
  • 2 large eggs, lightly beaten
  • 9 oven-ready lasagna noodles
  • 2 (8-ounce) packages shredded mozzarella

Above are the ingredients off the website, but I modified it slightly by using three cloves of garlic, cause I love garlic (I doubt one extra one made a big difference), and I used dried parsley leaves, only because I couldn't find any at the store. And as a note : the Parmigianno-Reggiano was very difficult to find at my grocery store, but after looking around for some time, I found it next to the cheese department. It's an expensive cheese; it costs $19.99 per lb. Thank goodness I didn't need that much!

So back to the meal preparation. First I took my ground chuck, italian sausage, onion and garlic and placed it in a large pot.

Photobucket

I cooked it until it was completely done and crumbly, make sure you stay close and stir it alot so it can cook evenly:

Photobucket

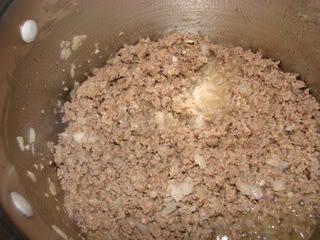
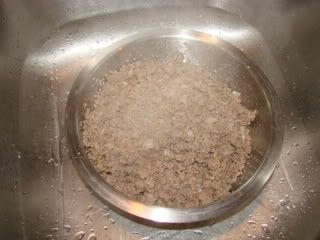
At this point, it smelled so good, my dog was circling the entire kitchen, I'm assuming, hoping for some to fall on the floor. Afterwards, I drained the oil using a collander.

Photobucket

Afterwards, I put it back on the stove, and added the oregano, basil, salt and pepper and all the tomato mixtures.

Photobucket

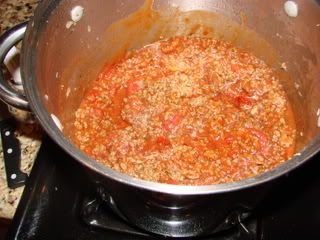
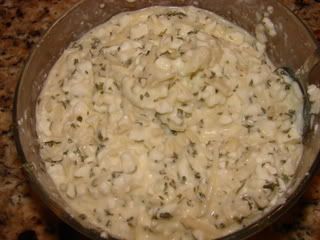
I returned it to boiling and then lowered the temperature and covered so it could simmer. Recipe says cook it for 30-45 minutes, but I did it for about 40 minutes. In the meanwhile, I prepared my cheese mixture. I took the eggs, cottage cheese, parmigianno-reggiano and parsley, and mixed it in the bowl.

Photobucket

I placed it in the fridge and got Alyssa before she thought I had lost my mind for leaving her unattended for so long :)

Photobucket

See that mean look on her face? Mom, it's taking you too long!

After my sauce had done cooking down, I noticed the liquid reduced and thickened up:

Photobucket

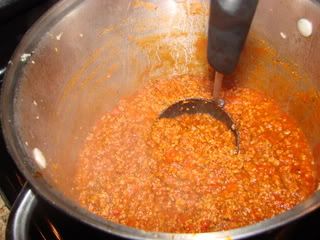
I couldn't help but taste it at this point, it tasted so good, and I realized that it would make a good spaghetti sauce! So if you run out of time, you could probably stop right here, and make some noodles and you have a pretty good meal!

Next, I started layering my lasagna. This part got tricky to me. I'm very much a measure by measure person, and for me, I want to know how many tablespoons, cups, etc. I need. And this recipe did not give me this at all, so I'm not completely sure if I did the layering correctly. I did some of the sauce meat mixture on the bottom, and then placed three oven ready lasagna noodles on top.

Photobucket

Photobucket

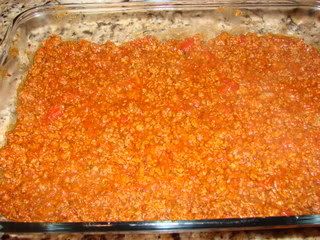
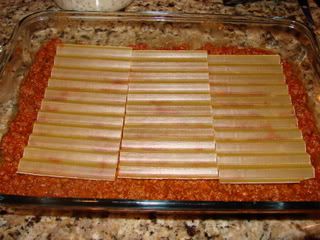
The oven ready noodles are very delicate, so take care when you take them out the package. I broke one just taking it out the plastic. After those two layers, I put my cottage cheese mixture on top, more meat sauce, and some mozzarella cheese.

Photobucket

Photobucket

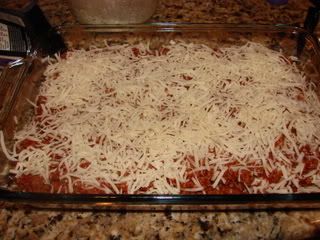
I repeated by putting three more noodles, cottage cheese mixture, meat sauce and mozzarella cheese. My last layer included three more noodles, cottage cheese mixture and then I stopped at the meat sauce. I placed it in the oven at 350 degrees for 45 minutes. After the time is up, I placed the remaining mozzarella cheese on top and placed it back in for another 15 minutes:
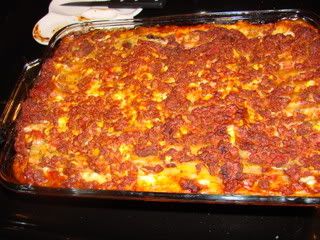
Photobucket

Before cheese

Photobucket

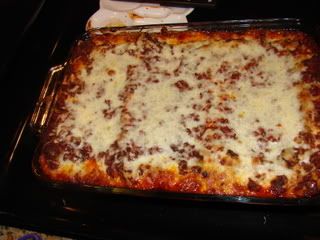
After cheese and 15 minutes
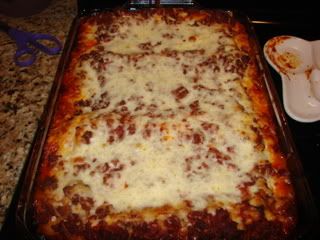
Another view:

Photobucket

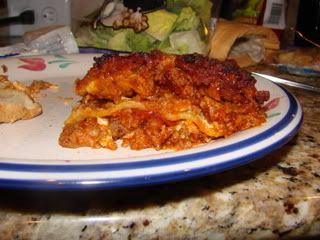
So it looks good, and boy did it taste good! The only thing I was concerned about was it had a slight sweet taste to it, but it was a crowd pleaser for everyone. I wish I would've had time to fix the garlic bread to go with it, but I will try it tomorrow for the leftovers. Instead, I made toast and caesar salad to go alongside it.

Photobucket

Overall, I was pleased with this recipe. Of course, on the show, Paula made it look so easy and quick, but it did take me some time to do it, but it may have been because I was juggling both kids and taking phone calls while doing it. Next time, I'm hoping to be a little more organized, and find my fresh parsley and make sure to evenly spread my mixture for my layers, because I do feel it was loopsided.

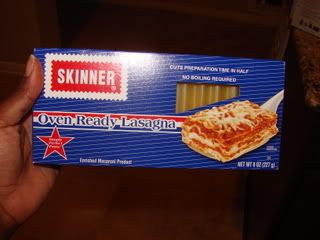
Side Note: If you haven't seen the special noodles for this recipe, this is what they look like:

Photobucket

http://www.foodnetwork.com/recipes/paula-deen/lots-omeat-lasagna-recipe/index.html

Tuesday, February 17, 2009

Valentine's Day Part II: Chicken Kabobs and Shrimp Kabobs

So, since it rained, I was unable to grill my steak and kabobs, so instead, I did the steak in the oven Saturday and it came out really good, but I had to watch it and time the cooking for both sides exactly. In the meanwhile, my meats for my kabobs had been marinated for at least a day; my chicken had begun marinated late Friday evening, and my shrimp had begun marinated Saturday afternoon. So by Sunday, they were ready to go!

Chicken Kabobs

Photobucket

This recipe was really easy and even though on the pic, they look slightly burned, that's the grilled look, lol, and they didn't taste burned. My grill was hotter on some sections than others. So, the marinade recipe, I think would be good just by itself on boneless skinless chicken breasts and maybe grilled on the stove. Below is the recipe for the marinade:
2 tbsp. oil2 tbsp. soy sauce2 tbsp. lemon juice2 tbsp. fresh parsley, snipped1/2 tsp. saltPepper to taste
  • 4 tablespoons toasted sesame oil
  • 4 tablespoons soy sauce
  • 4 tablespoons of lemon juice (about two whole lemon)
  • 4 tablespoons of fresh, snipped parsley
  • 1 teaspoon of salt
  • Pepper to taste

This was the recipe I got off cooks.com, with some modification, but since I needed to marinade four boneless, skinless chicken breasts and mushrooms, I doubled the recipe, so the one above is exactly what I used. I felt comfortable knowing that my ingredients were "swimming" in the marinade, as oppposed to just laying on top of it.

I used fresh button mushrooms from the grocery store, and boiled them for 2 minutes, and placed them and the cut up chicken in the bowl with the combined mixture above for overnight marinading. When it was time to grill, I made the kabobs then, so everything had a distinct taste (like no marinading the vegetables, but having them freshly cut prior to grilling).

I used one 8 oz can of pineapple chunks, and cut up one red bellpepper and one green bell pepper. I took my skewers and alternated my vegetables and meat. I'm not sure if it needed to be a certain way, but I did the following in order twice for one skewer: pineapple, mushroom, red pepper, chicken, and then green pepper. Again, one skewer took two of each ingredient.

After I made as many as I could (until I ran out of vegetables, cause I still had meat and mushrooms left), I placed them on the grill and checked them every 5 minutes, while basting with butter every time I flipped them. I took one off once it appeared they were cooked to check the center. After I took one off the first time, it looked great and after I tasted it, I was very pleased! So I took them all off. Some of them were more charbroiled than others, but again, I think it was due to my grill being hotter on one section than the other.

http://www.cooks.com/rec/doc/0,1739,154189-240192,00.html

Shrimp Kabobs

Photobucket

The shrimp kabobs were equally easy, and used almost the same ingredients from the chicken marinade. I admit, the chicken marinade asked for oil, but I loved how the sesame oil smelled and tasted so I used it for the chicken as well. Below are the ingredients for the shrimp marinade:

  • Juice from one 8 oz can of pineapple juice
  • 2 tablespoons of sesame oil
  • 2 tablespoons of soy sauce
  • 1/4 teaspoon of pepper (I used black, recipe called for white)
  • 1/8 teaspoon of garlic powder
  • 1/8 teaspoon of ground ginger

I took one pound of deveined and peeled shrimp, and placed them in the marinade and in the fridge. When it was time for me to make the kabobs, I did the same thing with the chicken, and cut up all my vegetables then. I did in the following order twice for each skewer: onion, pineapple, tomato and shrimp. I was supposed to use cherry tomatoes, but I couldn't find them at my local grocer, so I used, what I thought was the next best/similiar thing. They didn't do as well as I think cherry would've done; once heated up, they became very delicate, so as I was taking them off the grill, they were sliding off the skewer, so I had to take care to make sure they were still intact. I did the same thing as I did with the chicken, and basted them with butter ever time I turned them. They did not take as long as the chicken, so make sure to watch them more closely.

http://www.cooks.com/rec/doc/0,1745,154174-234204,00.html

For side dishes, I made baked potatoes (with cheese, sour cream, butter and bacon bits for topping options) for me and my husband, and fries for my son. I wasn't sure what side goes well with kabobs, but overall, the combination tasted really good. Below is my son's plate, minus the skewers (for obvious reasons...he's four, lol-they would've become swords).

Photobucket

Yes, that's a small bowl of barbecue sauce in the middle because at age four, he's into dipping everything! He enjoyed it, and he even dipped and ate the vegetables. The mushrooms didn't make it on his plate, because I ate them (YUMMY) and the pineapples, he ate while I was making his plate. But you get the point.

Next time I make them, I probably won't do anything different other than use the correct tomatoes, and maybe control the temperature on my grill better so they can look better. But overall, the taste was delicious, and I love the marinade. I think it would be a good idea to use that marinade, even if I wasn't making kabobs for grilling!

Monday, February 16, 2009

Valentine's Day Part I: Dessert Chocolate Covered Strawberries

For Valentine’s day, I had a nice spread designed to wow my husband, and because of the rain, my plans slowly got crushedL. However, in the spirit of my new found venture in learning how to cook, I decided to make my meal, but just do it to the best of my ability. My menu was the following:

· Black Pepper & Onion marinated Ribeye
· Loaded Baked Potato
· Shrimp Kabobs
· Chicken Kabobs & Fries (for my son)
· Chocolate Covered Strawberries

Saturday morning, I began making my chocolate covered strawberries. I knew they needed to chill for a bit, and I was going to cover them with chocolate, and then drizzle white chocolate on top, which meant it needed to be a two step process. I’m assuming that is. So first, I grabbed some semi-sweet chocolate chips, some Crisco shortening, wax paper, and some large, long-stemmed strawberries.

First: Preparing my double broiler


Photobucket

I made a double broiler, using a large pot for my water, and a smaller glass dish to place on top, which would sit on top, but not be submerged in the water. From my research, you do not want the water to mix with the chocolate. So I started to heat the water, though I wasn't too concerned about the temperature, because I knew I wasn't cooking anything in it, so it shouldn't matter.

Step Two: Wash my gorgeous strawberries

Photobucket

As you can tell, I got the really plump, bright red strawberries with alot of green foliage, and long thick stems. I think this is an option. They were more expensive than the other strawberries, but I invisioned they would look better overall than the smaller ones. Below is an upclose of one of these gorgeous strawberries.

Photobucket

Step Three: Prepare the chocolate

Once I got my water boiling, I added some chocolate chips and some shortening. To be honest, I didn't measure out, I just put some in until it looked like it would make enough chocolate. I had 15 strawberries that needed to be covered, and they were big. It seems the shortening was used to make the chocolate smooth, so as long as some is added, I don't think it matters how much.

Photobucket

Below are the different stages for the chocolate melting:

Photobucket

Photobucket

Photobucket

Photobucket

Be careful to stir it the entire time! It made the chocolate smoother when I kept stirring it, so it could melt evenly.

Step Four: Submerging the strawberries :P

Photobucket

I took each strawberry, and dipped it in the chocolate and rotated it until the chocolate was evenly coated. I did this immediately after I took it off the stove, so the chocolate was still completely melted.

Photobucket

I then placed each strawberry on a cookie sheet covered with wax paper. I tried to make them evenly spaced out so they would chill together and make one big strawberry, lol.

Photobucket

Finished product before chilling:

Photobucket

So then I went a little chocolate happy, lol, and started looking for other things to cover in chocolate. I found some bananas, and sliced them, and submerged them in chocolate also:

Photobucket

I placed them alongside the strawberries as best I could, and then threw it in the fridge in my long drawer and put it on the colder selection.

Photobucket

Seems pretty easy! I was impressed with myself, and even though they look lumpy now, they came out smooth once chilled.

Step Five: Remove from fridge, and prepare to eat

Photobucket

The only thing I was concerned with was the aesthetics of the strawberries. When they cooled, the chocolate that had laid alongside the strawberries also hardened, so it wasn't as perfect as I hoped. The real test would be the taste.

Photobucket

They were really good! The chocolate was smooth, and the different textures and tastes really was a good combination. I've only had chocolate covered strawberries (like this) only one other time in my life, and even though those were way better (they were made from Godiva chocolate, they can't help but be way better), these came out very good. My next thought was to drizzle white chocolate on them, but I never got around to it because I ran out of time. My next time I experiment, I'm going to definitely put the white chocolate on there also.

So try it at home! I want to experiment with the different ways you can cover a strawberry. Maybe add nuts one time, do just white chocolate, or, my biggest idea, take a favorite candy bar of mine, melt it and cover it on a strawberry. Look for future blogs regarding that!