Tuesday, March 24, 2009

Resturaunt Inspired Chicken Alfredo Experiment

Today I decided to experiment with on of my favorite italian dishes, breaded chicken with a creamy white alfredo sauce. I've had it a handful of times at various resturants, and never tried to make it at home until today.

First, I took a pack of boneless, skinless chicken breasts. They come about thee to four in a pack, so I decided to half them to make them thinner; which for me yielded 6 halves total. I took two eggs, slightly scrambled them in a bowl, and placed parmesan bread crumbs in another bowl. I took each half and dipped them first in the egg, careful to coat each side, and then dredged them in the breadcrumbs to coat also. I placed each on in a glass pan, that was already sprayed with non-stick spray.


Photobucket

I put it all in the oven on 375 degrees and baked for about 30-45 minutes. I'm putting a varying time, cause it really depends on the thickness of your chicken breasts for how long it takes. It took mine about 37 minutes to cook completely, without being dried out. SO WATCH IT CAREFULLY!!! Unfortunately, I'm the queen of drying out meat, so I had to learn to watch over my food as much as possible.
Photobucket
The chicken came out on the crispy side, and was really tasty as is (as you can tell, I took a piece off to try it, lol)
In the meanwhile, while the chicken was baking, I boiled my favorite noodles I thought would compliment the meal. I don't think it matters what kind you use. The closer my chicken got to being finished, I started warming up my creamy alfredo sauce. I decided to use:

Photobucket

There are a bunch of different name brands for alfredo sauce, but I was drawn to this one because it was on sale, AND it had mushrooms in it. I'm a mushroom fiend, lol.

As a side dish, I steamed some mixed veggies, which in my opinion, from my extensive "Top Chef" (Bravo TV reality show) exposure, gives nice color and texture to the meal.

Photobucket

Quick and easy!!

Photobucket

kid's plate

Photobucket

adult plate

Overall, this was very easy, and very tasty! Next time, however, I'd probably try to heat up the sauce in the baking dish during the last couple of minutes of baking, so that way the whole meal can taste integrated. While it was very good, it tasted like noodles topped with chicken and then topped with alfredo sauce. It didn't taste blended like you would taste at a restuarant. I was nervous about cooking the chicken too long, which is why I thought heating it up on the stove top was a good idea. But timing, obviously, is the key. So try it at home, or give me your variation of this yummy dish!

Sunday, March 15, 2009

Pimpin' out Pancakes

Photobucket

This morning, I woke up craving some over the top delicious, but different pancakes. I had all sorts of ideas going through my head... one in particular was banana walnut pancakes. Never before have I experimented with pancakes; either I have been to scary about the possible results or didn't have ingredients to play around or the time. Well, today, I decided to experiment with my pancakes, and I'm so glad I did!

First, I like the fact that "pimpin out pancakes" needs no rhyme or reason. I literally made a batch of Aunt Jemima pancake mix and grabbed all my fixings to just throw in it. Now, my family is very traditional when it comes to making pancakes, so I dare not experiment with their Sunday breakfast. So I made their pancakes first, and then I played around with mine.

To prepare, I sliced some very ripe and soft bananas into thin chunks, and then I cut those thin circles into semi-circles. I added some walnuts (I had some left over from my banana fosters recipe) to my cut bananas, and just stirred it around to make them evenly mixed. After I poured a couple of spoonfuls of the pancake mixture into my hot pan, I sprinkled the banana/walnut mixture on top, and then topped it off with more pancake mixture. Once I saw the bubbles in the pancake mixture (a sure sign it's ready to flip), I flipped it over. Be careful if you try this, the pancake is really heavy, so you can make it quite messy if you don't go slowly and take your time during the flip. It cooks really quickly, so a couple of flips, and you are done. I always put my butter on each pancake as soon as it comes off the pan, so the butter can melt (yummy).

I had some bananas left, and some chocolate chips, so I made some banana chocolate chip pancakes next. I did the same thing, spooned some pancake mixture on my hot skillet first, and then sprinkled with my semi-circle bananas and chocolate chips and topped it off with more pancake mixture. WARNING: Chocolate chips melt very quickly, if you didn't already know that, so you have to be quick! I learned that the hard way; while trying to wait for my bubbles to come through, I noticed some of the melted chocolate had started to cook in the pan through the pancake mixture. I think a good way to combat this is to wait until that bottom layer cooks completely, hence those air bubbles start popping through, and then throw the chocolate chips on top, so that way they won't slide down between the wet mixture and cook on the pan itself. And that way you can flip it quickly, and move not mess up the integrity of the pancake.

At this point, I couldn't find anything else I'd be willing to try. There was some ice cream topping stuff, that I considered for a split second, but by this time, I knew two experimental pancakes was probably enough, considering I didn't know how they were going to taste. So I decided just to make the last little mixture left as a regular plain-o pancake, lol.

Sat down to take a bite out of my creations, and WHOA...
I should've tried this a long time ago! Especially the banana walnut pancakes! At first, the texture threw me off, cause the bananas were a little slimy and the walnuts were firm and crunchy, but overall, the combination was really good! Now the chocolate chip banana ones were interesting as well, but I liked the banana walnut ones alot more! After eating them both, I gave Devin my plain-o pancake (he was on his fourth one by then...what am I going to do with this growing boy!!) so I was plenty satisfied with the two I had. Just wish I would've been more confident and made two, cause it left me wanting more!
I didn't get a chance to take any pics because my batteries were dead, but I highly recommend being imaginitive with your pancakes next time you have time. I found some tips online to help you next time you cook your pancakes:
  • Stir the batter with a whisk or fork just until dry ingredients are blended. The batter will be lumpy.
  • Overmixing the batter will make the pancakes or waffles tough.
  • Use a heavy frying pan or griddle for pancakes.
  • Preheat the griddle in advance, the griddle or waffle iron is hot enough when drops of water sprinkled on surface will dance.
  • Too cool a griddle produces flat, tough pancakes.
  • Too hot a griddle causes outside of pancakes to brown before center is cooked.
  • Cook pancakes until top side is full of bubbles; turn to do other side.
  • Batter that is too thin will result in flat pancakes.
  • Batter that is too thick won’t spread on griddle.
  • Turn pancakes only once during cooking.
  • Make big batches of pancakes & waffles to freeze the extra for quick & easy breakfasts.
  • Extra batter can also be refrigerated.

If you have any ideas on how to pimp out your pancakes, please share! I'd love to try experimenting more with it!

Wednesday, March 4, 2009

Challenge from the Dinner Spinner

So, I got my first iPod Touch a couple of weeks ago, and I simply adore it! I immediately spent hours in the app store while it was charging to find cool apps to add to it, forgetting the fact that it's an MP3 player (yeah, I have yet to put all my songs on there).


One of the cooler apps I put on there was compliments of All Recipes.com, one of my favorite recipe sites. It's called the Dinner Spinner (see it here: http://allrecipes.com/Features/More/iPhone.aspx). So with one click, you are on the home page. With the flick of the wrist in a shaking motion, it's shuffling through three categories: dish type, ingredients, and ready in. The first time I played with it, the first thing that came up for dish type was dessert, ingredients was fruit, and for the ready in, it said "slow cooker". Now I'd cook everyday in my slowcooker if I could find enough recipes to do it in, I really enjoy the freedom it gives you. And I've never met a slowcooker recipe my family didn't love. Literally, throw the ingredients in, cut it on, watch tv, play with your kids, check email, talk on the phone, go out to the stores, etc., and hours later, you got a delicious meal! So I digress...


So this app is suggesting it can find a fruit dessert recipe that can be done in a slow cooker. My first thought is "Yeah right" so I click "view matches" to see what it had. So to my amazement, the recipe it shows is a Slow Cooker Bananas Foster. WHAT! Anyone who knows me knows I LOVE bananas foster. Pretty much any dessert with bananas, I'm all for it. So I knew immediately, I'd have to try this dessert. The modified recipe is below (I say modified, cause the original says to use 1/4 cup rum, and I didn't want to use rum and I added 2 tablespoons of extra butter to compensate for the no rum factor)


Slow Cooker Bananas Foster


  • 4 Bananas peeled and sliced

  • 6 tablespoons of butter, melted

  • 1 cup of packed brown sugar

  • 1 teaspooon of vanilla extract

  • 1/2 teaspoon of ground cinnamon

  • 1/4 cup chopped walnuts

  • 1/4 cup of shredded coconut

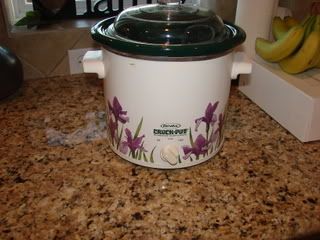
So I grabbed my crockpot out the pantry, which I have yet to use since moving into our new home. It's a bit old school; I recieved it as a wedding gift when we got married in 2000. Check it out, lol:

Photobucket

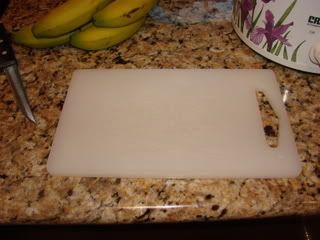
I highly recommend, for any cook, to have a couple of cutting boards of different sizes on hand. I use this one for cutting fruit and vegetables, etc. Even though I have granite countertops, which is supposed to be safe to cut on, I'm not taking any chances, so I use my small cutting board to slice up the bananas.

Photobucket

I then placed all my ingredients in the cooker. The recipe suggests adding the coconut and nuts at the last 30 minutes, but knowing what I had to do that evening, I knew I wasn't going to be able to pay attention and remember to put it in. I hope it didn't affect the outcome too much, but we'll get to that later...

Photobucket

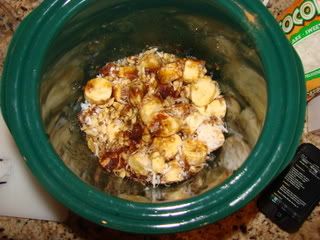
At this point, it already smelled really good. You can check out my ipod with the recipe sitting next to my crockpot, lol. So I stirred it around, and then cut it on. It took roughly 2 hours and half hours to cook to the point where I was happy with it. The recipe says to put cooker on high and cook for two hours and ten minutes. An extra twenty minutes wouldn't seem to make that big of a difference, but it tasted a bit thicker and looked more cooked after I checked it the second time.

Photobucket

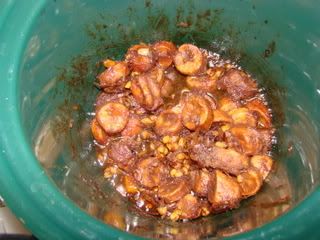
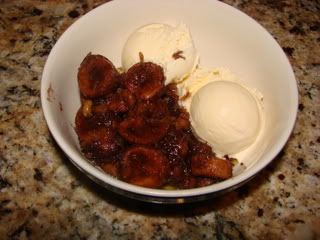
Easy enough right? I know it doesn't look too appealing on the picture, but my kitchen area smelled so good from it, I couldn't wait to taste it. So I just served it with two scoops of ice cream and dug in!

Photobucket

First of all, the combination of hot and cold (this was served immediately after I turned my crockpot off) is already very good. So that immediately excites me, lol. But the sauce of this dessert, along with the banana-nut-coconut combination, was really good! I was very surprised! The only thing that I questioned was the consistency of the bananas. They weren't soft like I imagined they would be, but rather, stiff on the outsides and soft on the insides. I used very green bananas, so maybe I should've used riper ones (but that's all I could find at my grocery store). Also, I don't know if the rum factors in when cooking the bananas more, but I thought my son would try it and I'm nursing, so I was fearful of putting the rum in it. Also, my liquor box is still packed up, so I couldn't access my rum very easily, lol.

So next time, I will probably try to follow the recipe to the tee, and pick better bananas. I really enjoyed my version, so I will definitely try it again! Unfortunately, I was the only one able to taste-test it; my whole family was knocked out sleep. I did have leftovers of course, so I'll have to update how the reheating goes.

Oh, by the way, be careful eating this delicious recipe. According to the info on my dinner spinner, one serving is 541 calories! It has 31 mg of cholesterol, 84 g of carbohydrates and 20.7 g of fat! Ouch! Still worth it though! LOL